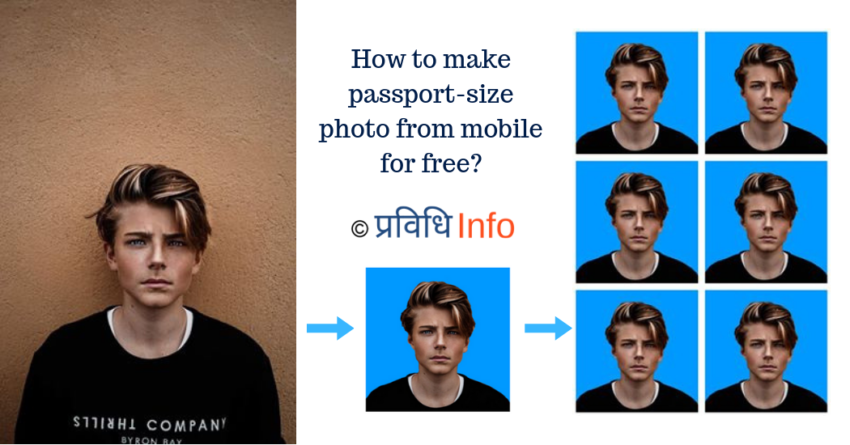
Whether you are applying for an official document like citizenship, passport, Identity card, or filling your academic application, you will require a standard size photo. Depending on a document and country, there is a different standard for the photo. Most of the time passport-size and auto-size photo with a white background will work, however, sometimes you may require a custom size photo with a custom background.
Every time, visiting Photo Studio to take a photo is time-consuming and expensive. However, you can easily and freely create a photo for yourself using your mobile. Here in this article, we will show you how to make a passport, auto-size photo from your mobile without paying any money.
Applications used to create passport photos in this tutorial are :
- Any Mobile Camera Application
- Snapseed
- Background Eraser
- Picsart
- Passport Photo Editor
Table of Contents
Step 1: Taking Photo
First, you will need a high-resolution photo to make a standard passport-sized photo. Select a good quality fresh photo from your gallery or take a photo from your mobile. You can use the default camera application of your mobile or any third-party application to take the photo.
For better quality photo:
- Have someone else to take your photos. Do not take selfies.
- Use a plain background, this will make easy while editing photo background.
- You must be facing forward directly at the Mobile camera.
- Your both ear should be seen in the photo.
- Take off anything covering your head like eyeglasses, hat, scarf, headphones, etc. while taking a photo.
- Do not apply any filter while taking the photo. Your photo must look natural.
Step 2: Editing Photo
After taking a photo, you can edit the photo to change brightness, contrast, etc. using your favorite image editor. But, the photo must look natural.
You can use Snapseed mobile application to edit the photo. Snapseed is one of the best free image editor application available for mobile. This is developed by Google. This application is available for free and is also ads free.
Also Read: Download Adobe Photoshop Full Version for FREE
Step 3: Removing Background from Photo
To remove the background from the photo, we will use the Background Eraser application.
- First, open Background Eraser application.
- Then, click Load a photo, and select the photo.
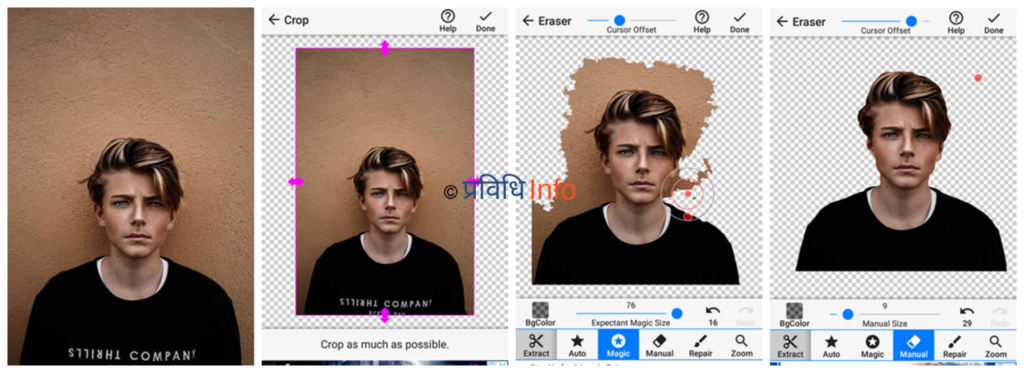
- After that, you can crop and remove the extra area from the photo.
- Now, you will see the main screen to erase the background.
- Use the eraser and remove background from your photo. You can use any eraser mode. Here are the simple notes on this eraser screen of Background Eraser application.
- Cursor offset: Using this slider you can change the distance between the erasing area and your finger point in the screen.
- Slider in the lower area (Size slider): This slider change the size of the erasing area. Make it large when you have to remove large area and make it small when you are removing small area or near the border of image and background.
- Zoom: When you are erasing background near photo border zoom the photo and decrease the size of other tools. This will help you to exactly erase small corner without erasing the main photo like in hair side.
- To zoom in/out & move, Select Zoom and use your two fingers.
- Auto: It will remove all similar area automatically.
- Magic: Use this mode to erase the background near the photo border. It detects image edges automatically.
- Manual: Erasing in this mode will erase the pointed area only.
- Repair: Use this to recover the mistakenly erased area in the photo.
- Extract: In this mode, first, select keep and mark the photo. And again, select Remove and mark the outer area, then press done. This will automatically detect the edges and removes the area out from inner mark to outer mark.
If you test this application for a while, you will easily understand how to use it. You can also check their simple tutorial by clicking “How to use” on the opening main screen.
- When you finish erasing Click done, then save the image by clicking the save button.
- Now, click Finish. This will save your photo with a transparent background.
Step 4: Changing Photo background
After removing the photo background, you have to place a plain background in the photo. For this task, we will use PicArt application. You can also use this application to erase the background, however, Background Eraser application is easy and optimal to use.
To Change the background of the photo, follow these steps:
- Open PicsArt application.
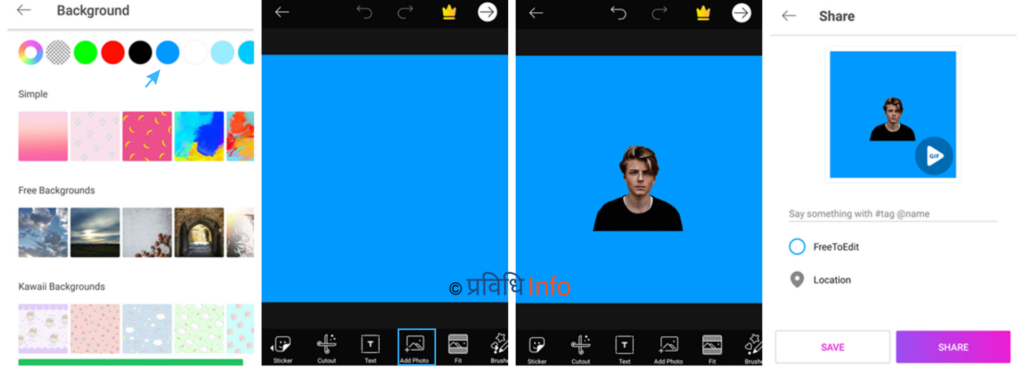
- Click on Plus sign (+), then click on Background.
- Now, you will see a list of color at the top row.
- Select the color which you want to place in the background of your photo (Generally White color). If you didn’t find the color you want, click on the first ring shape option. This will open the color chart. Select the color you want, and click on the tick button.
- Now, the plain background is loaded in the screen.
- Slide the menu at the lower portion of the mobile screen, and click on Add Photo.
- Select the photo we prepared in the previous step, and click ADD.
- Now, your photo with a transparent background is loaded in plain background. Press on the tick button.
- Click on the arrow button on the right top of your mobile screen. Skip if you see any ads or option to upgrade to premium.
- Press the Save button, then you will see three option, select save. This will save your photo with a plain background.
Step 5: Preparing photo size and making printable
Now, you have to prepare your photo in a standard size. As we mentioned earlier, the different country and the different document has a different size requirement. For example:
- Nepali passport size for general use: 1.2*1.5 inches
- Auto size photo for an Identity card and normal use: 0.9*12 inches
- Photo size for Machine Readable Nepali Passport(new): 35*45mm
- Photo size for USA passport: 2 x 2 inches
- Photo size for DV applicant: 2 x 2 inches
However, you don’t have to remember these standard sizes. All standard size for the different country can be automatically selected in this step.

For this task, we will use Passport Photo Editor Application. Now, follow the below-mentioned step:
- Open Passport Photo Editor Application.
- First, click on ‘New Photo’, then click on Gallery.
- Now, select previously saved photo.
- Then, click on Start Editing and select Continue with Ads, then press done.
- Here, you will see the list of photo-size for different country and document. Search your country and select the document type like ‘Nepal: ID, Auto Size’, ‘India: Passport’, ‘United State- USA’ etc.
- Then, match the face and guideline area. You can change the size of the guidelines by dragging the edge of the guideline area. You can move the guideline area, by dragging inside the edge of guideline area.
- Press ‘Done’ (twice).
- Click Save. You will be asked to remove background, click Skip.
- Now, add a border to the photo by clicking on Add Border. And, save the photo.
- Your Passport-sized or auto-size photo is ready to use. If you want to print this photo, click on Print Multiple Copies, this will add numbers of photos in the one printable paper size form. So, you will get multiple passport-size photos in one printable Image.
- Now, select paper size, for normal purpose, 4*6 inches paper is best. This paper fits 10 -12 copies of the photo (for Nepali passport size photo).
- After that, you can change the gap between photos and number of photos using + and – button shown on screen. When you finished, click Save.
- Change the name you want to remember later, and press Save Photo.
- Now, your photo is ready to print. When you need a printed passport-size photo, you can bring this final image to your nearest photo studio, and print without wasting much time and money. It will cost you 10 times less than the photo preparing in the photo studio. In Nepal, you can print this photo in 20 – 50 Nepali rupees.
ALSO, CHECK OUT:
- How to get Grammarly Premium for Free?
- How to get Pluralsight Subscription for Free?
- How to Get Paid UDEMY Courses for FREE?
- How to get LinkedIn Premium & LinkedIn Learning for free?
We hope this tutorial helps you to create passport size photo on your own. If you are having any problem following this tutorial, please do let us know in the comments below. You can always reach us out at Prabidhi Info Facebook and Twitter for any tech-related support and queries!