Nepal Government issued the notice on Shrawan 1, 2076 regarding the PAN Card where it was stated that citizens earning more than Rs 1000 must apply for it.
Permanent Account Number (PAN) is a unique identification number issued by the Government Officials to employees who are paying the tax to the Government. In Nepal, the PAN card is of nine alphanumeric characters. This denotes one’s profession. Once you have registered the PAN Card number, it never changes although you may change your profession. PAN Card registration is mandatory for financial transactions (taxable salary, professional fees, sale or purchase, etc.).
Table of Contents
Who must obtain a PAN Card?
According to the law of Nepal, the following entities must have a valid PAN Card Registration number:
- People engaged in Business (commercial transaction)
- Company/business that has to pay income tax
- All organizations deducting tax at source.
Value Added Tax
The VAT is a broad-based tax as it covers the value to each commodity by a firm during all stages of production and distribution. It is a modern tax system to improve the collection of taxes, to increase efficiency and lessen tax evasion. It’s the backbone of the tax system.
In simple words, the VAT is a tax imposed on the value added to goods and services consumed in Nepal. The VAT registration is required for any individual with a turnover more than NPR 50 lakhs in case of goods and more than 20 lakhs in case of services, any entrepreneur carrying on small transactions on his own will, business ( IT Consultancy, Electronics, Software, Liquor, Health club, Motor parts, Scrap, Trekking, Tourism transportation, etc) even below the threshold, etc are required for VAT registration.
In addition to consumers, persons involved in commercial activities (individual, firm, company, association, cooperative, institution, joint business, partnership, trust, government body or religious organization) are affected by VAT.
Required Documents for PAN Card Number Registration:
- National Identification Card-Driving License or Citizenship or Voter Card
- Scanned Passport size photo
How to Register PAN Card in Nepal?
Application for PAN Card Nepal Registration
First of all, you must be registered to IRD (Inland Revenue Department) before the registration of the PAN. Follow the given steps for registration.
STEP 1: Visit the Official Inland Revenue Department website.
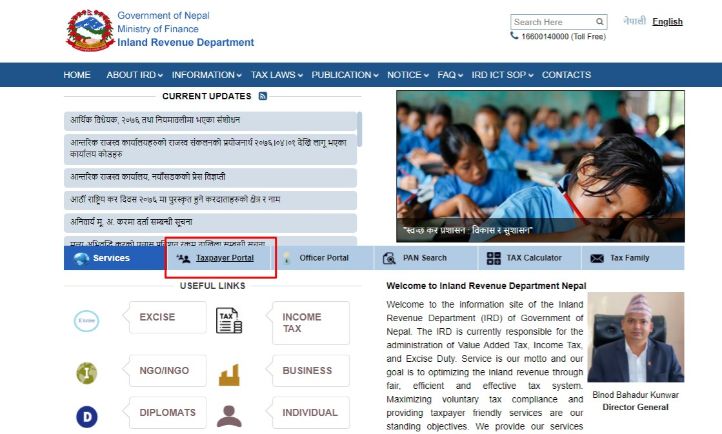
STEP 2: Click on ‘Taxpayer Portal’ below the Services Tab, as shown in the figure. ‘Taxpayer Portal’ will be opened in a new window.
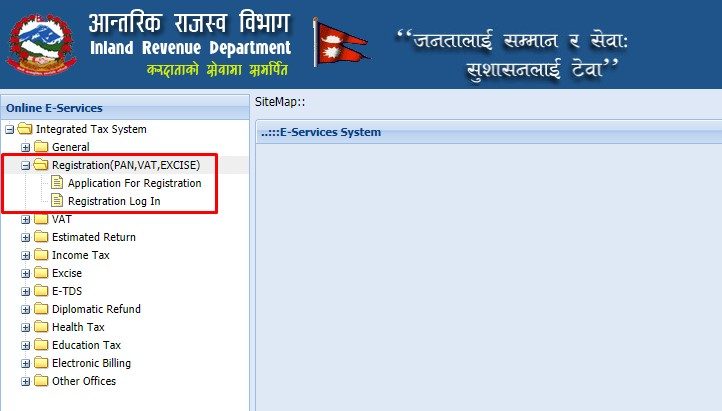
STEP 3: On the left-hand side, you will see ‘Online E-Services Tab’. Click ‘+’ sign on Registration (PAN, VAT, EXCISE) as shown. This will give you two options: ‘Application For Registration’ and ‘Registration Log In’ as shown below.
STEP 4: Click on ‘Application for Registration.’ You will be asked to fill the details. This is necessary for receiving the ‘Submission Number’.
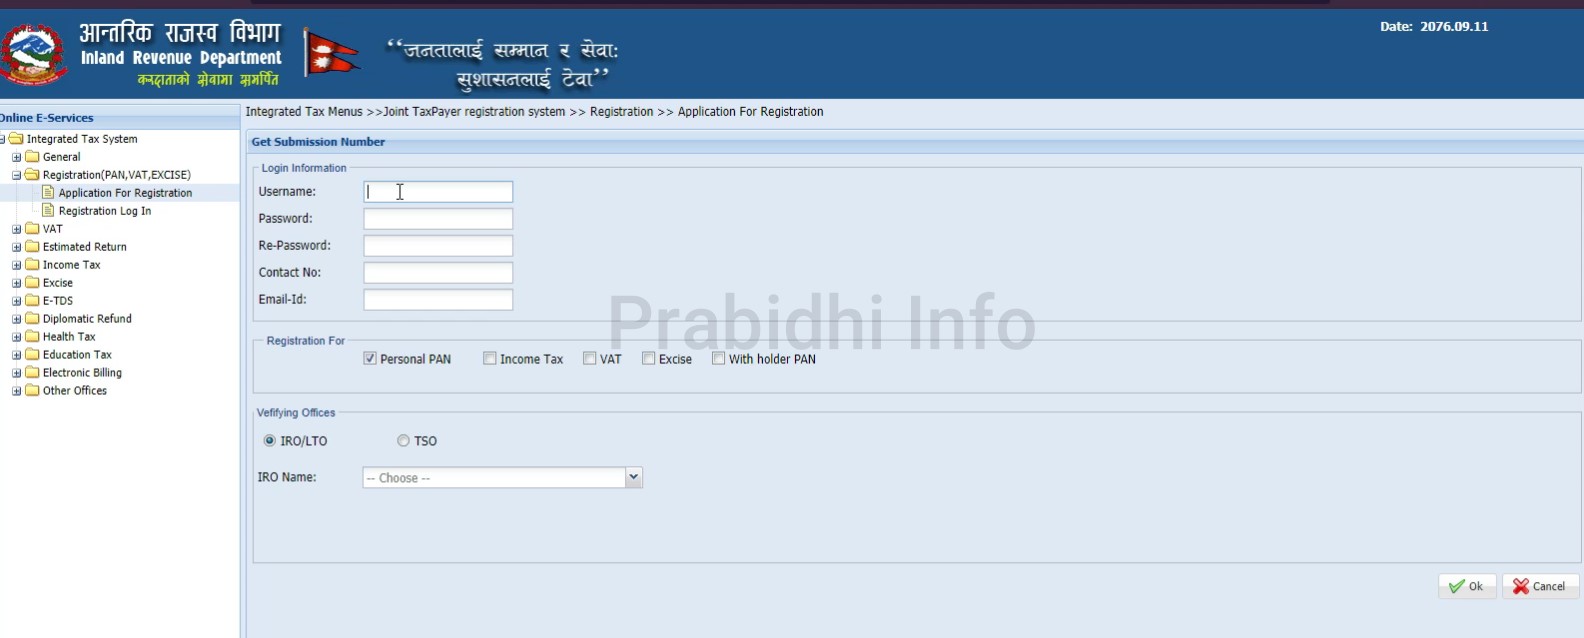
STEP 5: Under the ‘Login Information’ fill your username, password, contact number, and email address. Make sure you enter the username consciously as the username is case sensitive. Your password must be at least six characters.
Registration For
STEP 6: Tick the box (‘Personal PAN’ or ‘Income Tax’ or ‘VAT’ or ‘Excise’ or ‘With holder PAN’) that you need to register for.
How to apply for Personal PAN Registration in Nepal?
Under the ‘Registration For’ section, On STEP 6: Tick on ‘Personal PAN’. Then, follow the steps mentioned below accordingly to complete the Personal PAN Card Number registration.
STEP 7: Under Verifying Offices, select where the application is to be registered. Then click on ‘OK’. Under the ‘Verifying Offices’ section, select the nearest location for you to issue the PAN Card. Either IRO/ LTO or TSO. They are responsible for ensuring the correctness and adequacy of your details.

STEP 8: Note down the given ‘Submission Number’ and proceed to ‘Continue’. (This is required to print the form as well as for the verification by the Tax Officer. You must remember your username and password). Then you will be directed to ‘E-Person Registration’ page.
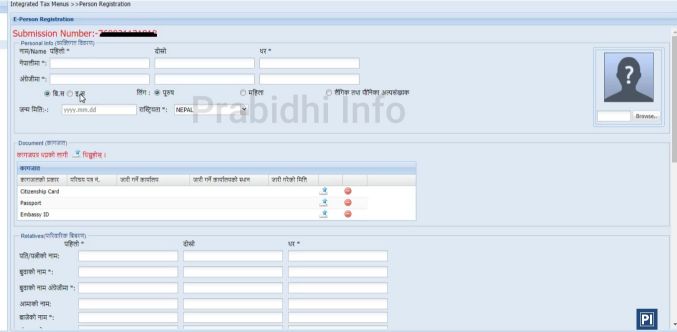
STEP 9: Under ‘Personal Info’, enter your name both in English and Nepali, Date of Birth, Nationality, and Gender. To type in Nepali, you can use: Type in Nepali
STEP 10: Under the ‘Document’, upload Citizenship or Passport or Embassy ID. You have to submit a scanned copy of only one document out of the given options. You must scan the document (Citizenship or Passport or Embassy ID) in black and white mode.
STEP 11: If you already have a passport-sized photo, you can upload a scanned passport size photo. If not, you can create a passport-size photo by following the steps mentioned in this post: How to make a passport, auto-size photos from mobile for free?
How to Scan your Photo/ Signature?
You can easily scan your photo, document, signature, etc. and create a jpg, pdf file by using your mobile using the following application:
STEP 12: Fill Relative Details and enter your Professional Certificate Number.
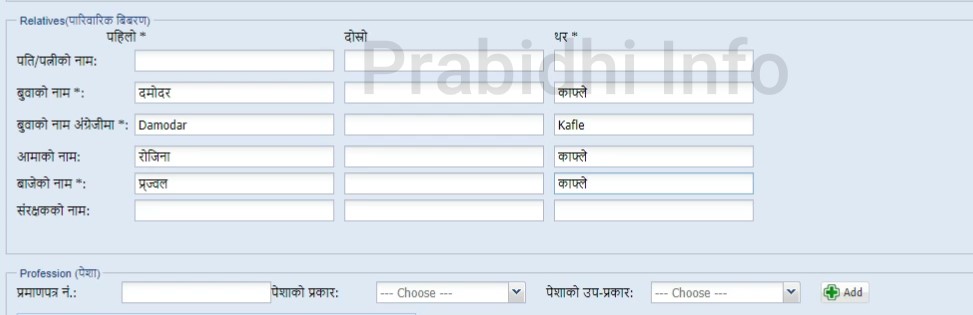
STEP 13: Select Professional Category and Professional Sub-Category from the list. To add Professional Data click on ‘Add’. You can add more than one Professional Data. And enter all the details under the ‘Address’ section.
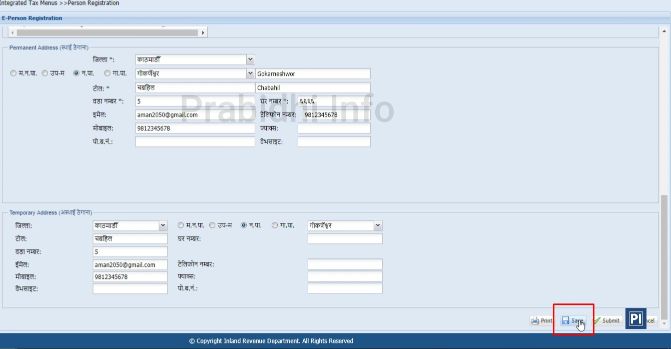
STEP 14: Click on ‘Save’ to save all of your data. You can click on ‘Print’ for the preview of your application to see if there are any errors. If there are any errors you can edit the application.
STEP 15: Edit Application
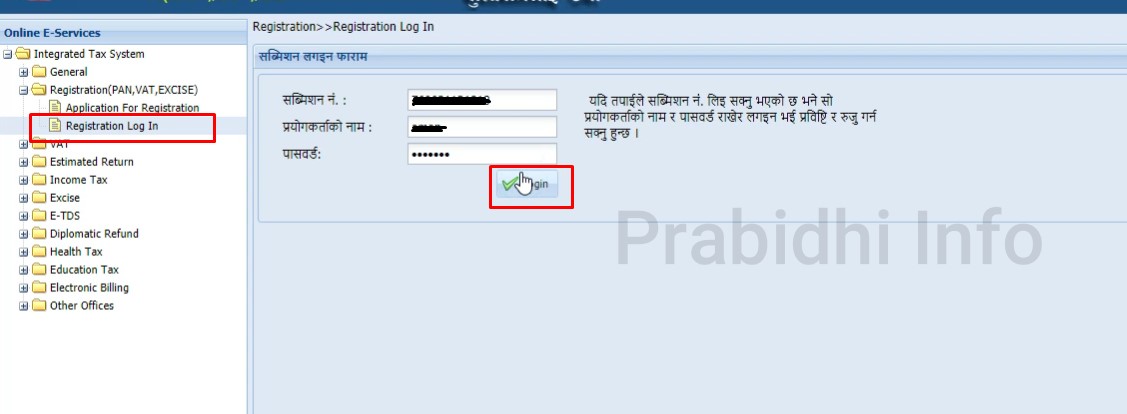
To edit the application, you have click on ‘Registration Log In’ seen on the left-hand side as shown below. Then you have to ‘Log In’ with the username, password and the submission number given to you in the “STEP 8”. Then your application will be displayed and you can make corrections.
STEP 16: After entering all the data and making the correction (if there’s any) you can submit the application. Click on the ‘Submit’ button. Your submitted application will be displayed in the mitted List’ in IRD officer’s portal.
How to Apply for PAN Card Number Registration for Business?
STEP 1 to STEP 5 from ‘Application for Registration’ are the common procedures for all kinds of PAN Card Number registration, so the process for ‘PAN Card Number registration for business’ follows the same. So, complete STEP 1 to STEP 5 and follow the steps mentioned onwards.
STEP 6: Under the ‘Registration For’ section, Tick on ‘Income Tax’.
STEP 7: Under Verifying Offices, select where the application is to be registered. Then click on ‘OK’. And note down the given ‘Submission Number’.
STEP 8: Select your Business type, Business Sub-Type. You will be asked if you have PAN or not, tick on ‘No’. And click on ‘Continue’. You will be directed to the ‘Business Registration’ Page.
STEP 9: Enter Trade Name in English and Nepali. To type in Nepali, use Type in Nepali.
STEP 10: Enter the registration details [Business Registration Date, Registration Number, Place of Registration, and Business Start Date].
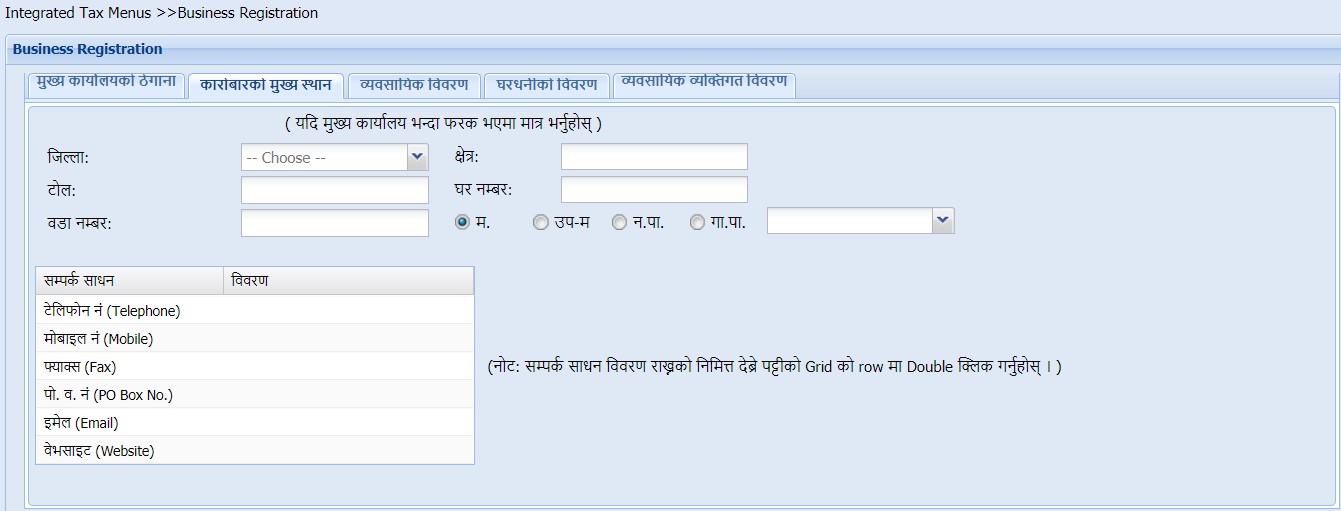
STEP 11: Tick whether the Business is new or transferred from another owner. Then, you can see 5 different tabs. Under “मुख्य कार्यालयको ठेगाना “, enter the ‘Address of Main Office’. Similarly, under “कारोबारको मुख्य स्थान “, enter the address of Main Place of Business, under “व्यवसायिक विवरण “, enter business details such Business Type, Business Sub-type. You can also add more than one business detail, to do that, click on the ‘Add’ button to add details. These Business Type and Business Sub-type will be displayed in the Certificate, so fill them responsibly.
Likewise, under “घरधनीको विवरण “, enter Land lord’s details (if the office is in rented property). This includes PAN (Land Lord’s if exists), Name, Area (sq. ft.), Parcel Number, Rent Amount, Land Lord’s Address). And under “व्यक्तिगत व्यवसायिक विवरण “, enter Business Personnel Detail such as Details of Managing Director/ CEO, and for “शाखाको विवरण”, enter the Branch Details (if a branch exists) such as Branch Serial No., Branch Start Date, Branch Name (English + Nepali), Branch Address. Click on ‘Add शाखा’ to add a branch.
STEP 12: Click on ‘Save’ to save all of your data. You can click on ‘Print’ for the preview of your application to see if there are any errors. If there are any errors you can edit the application.
STEP 13: You can also edit application if required, to edit the application, you have click on ‘Registration Log In’ seen on the left-hand side as shown below. Then you have to ‘Log In’ with the Username, Password and the Submission number given to you in the “STEP 8”. Then your application will be displayed and you can make corrections.
STEP 14: After entering all the data and making the correction (if there’s any) you can submit the application. Click on the ‘Submit’ button. Your submitted application will be displayed in the Submitted List in the IRD officer’s portal.
How to Apply for PAN Card Registration for Proprietary Business?
For the ‘PAN Card Number Registration for Proprietary Business’ too, follow STEP 1 to STEP 5 from ‘Application for Registration’. And proceed to steps mentioned below.
STEP 6: Under the ‘Registration For’ section, Tick on ‘PAN’.
STEP 7: Under Verifying Offices, select where the application is to be registered. Then click on ‘OK’. And note down the given ‘Submission Number’.
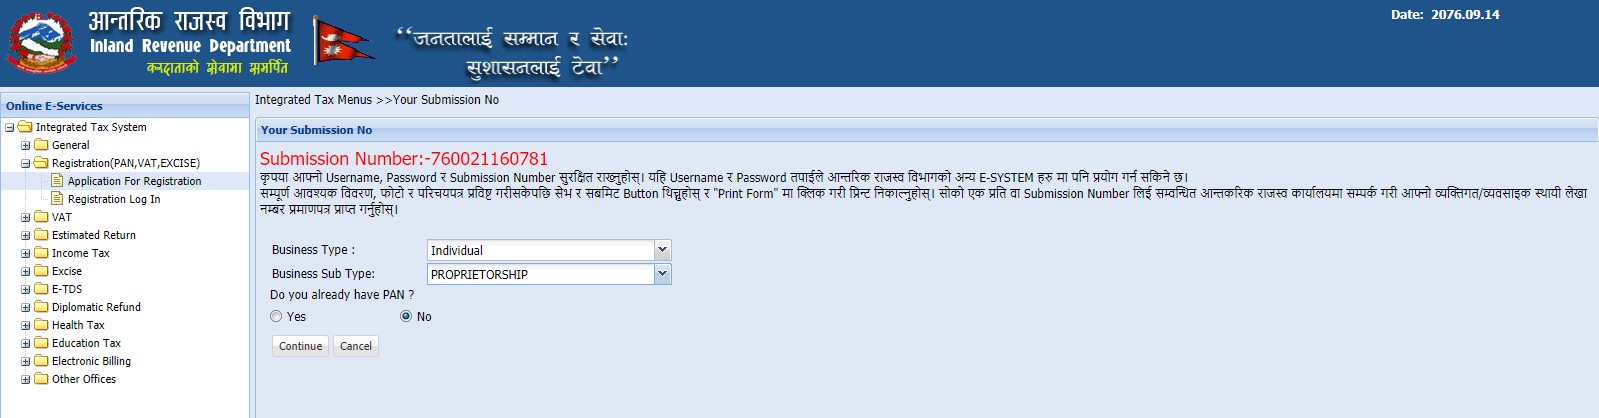
STEP 8: Select Business Type: Individual, Business Sub-Type: PROPRIETORSHIP If the taxpayer has already received the PAN from the Office of Company Register (OCR) press ‘Yes’ otherwise press ‘No’.
STEP 9: Click on ‘Continue’. You will be directed to ‘E-Person Registration’ page. And follow “STEP 9 to STEP 16” from ‘Personal PAN Registration’.
STEP 10: Then click ‘Next’. You will be directed to the ‘Business Details Entry’ page. And follow “STEP 9 to STEP 14” from ‘PAN Registration for Business’.
Your submitted application will be displayed in the ‘Submitted List’ in the IRO officer’s portal.
How to Apply for PAN and VAT for Business?
The ‘Registration for PAN and VAT for Business’ also incorporates common steps from STEP 1 to STEP 5 from ‘Application for Registration’. So, follow those steps and then proceed as below.
STEP 6: Tick ‘PAN’ and ‘VAT’ together.
STEP 7: Under Verifying Offices, select where the application is to be registered. Then click on ‘OK’. Then you will be directed to ‘Your Submission Number’ page. Note down the given ‘Submission Number’.
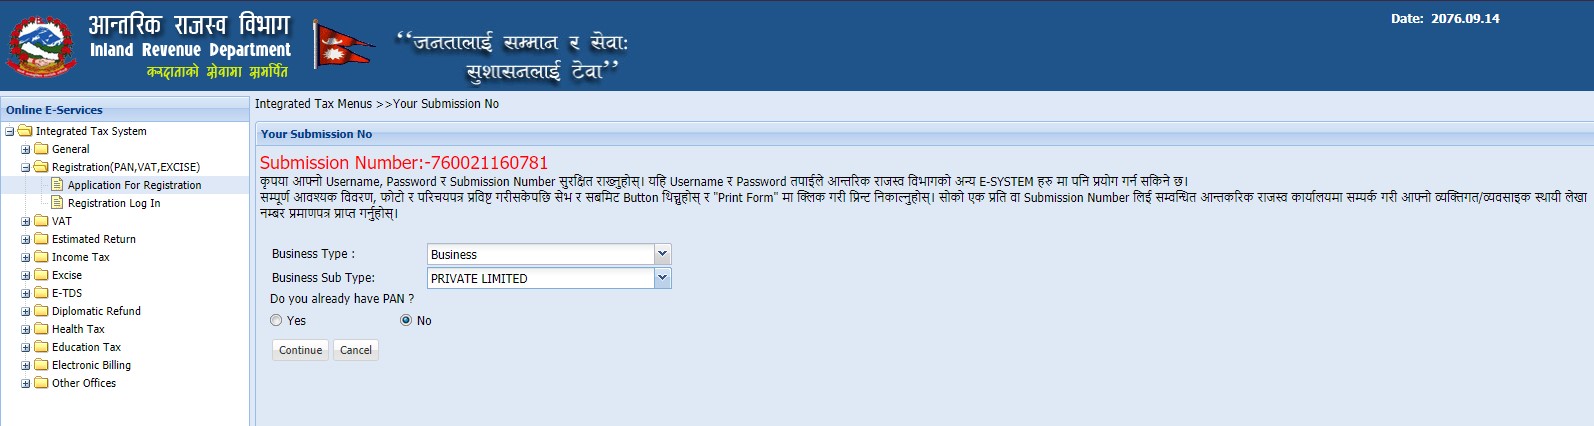
STEP 8 Select Business Type (Individual or Business) from the list. Select Business Sub-Type from the list. If Business is selected in the previous STEP list will contain ‘Private Limited’, ‘Public Limited’ etc.
STEP 9: If the taxpayer has already received the PAN from the Office of Company Registrar (OCR) press ‘Yes’ otherwise press ‘No’. If ‘Yes’ is selected in the radio button following fields will be displayed.
STEP 10: Select ‘Manual’ if PAN was issued by the field officer, select ‘OCR’ if PAN was issued by the Office of Company Registrar, and select ‘Allocated’ if PAN was allocated already during VAT registration.
STEP 11: Enter PAN number. If ‘No’ is ticked on STEP 9, no need for STEP 10 and 11.
STEP 12: Click on ‘Continue’. Then you will be directed to the ‘Business Registration’ page. Follow “STEP 9 to STEP 14” from PAN Registration for Business.
STEP 12: Then, click ‘Next’. You will be directed to VAT related information page. And enter VAT related data.
STEP 14: Click on ‘Save’ to save all of your data. You can click on ‘Print’ for the preview of your application to see if there are any errors. If there are any errors you can edit the application. Then submit your application.
Your submitted application will be displayed in the ‘Submitted List’ in the IRO officer’s portal.
How to Register for VAT for Business and Proprietary Business?
Follow STEP 1 to STEP 5 from Application for Registration.
STEP 6: Tick on ‘VAT’.
STEP 7: Under Verifying Offices, select where the application is to be registered. Then click on ‘OK’. Then you will be directed to ‘Your Submission Number’ page.
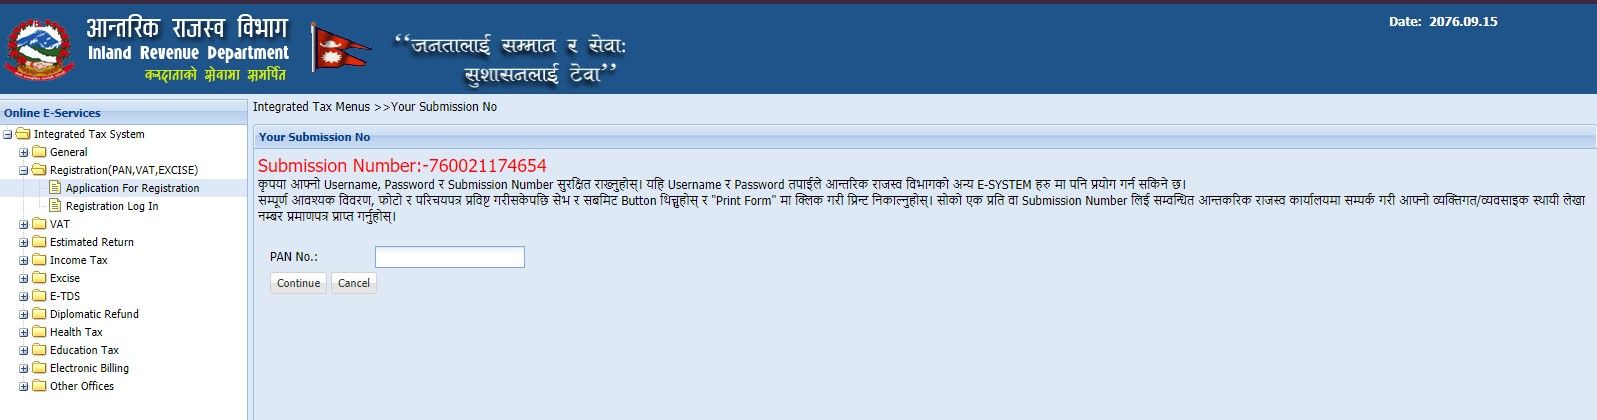
STEP 8: Note down the given ‘Submission Number’ then enter ‘PAN’ number.
NOTE: PAN is mandatory since to be registered in VAT taxpayer must be registered in Income Tax.
STEP 9: Then you will be directed to ‘Business Registration Page’. Press pen sign at the bottom of the screen in the business list. The system will load existing business detail. Press ‘Next’ button to go forward. Then fill all the necessary details.
STEP 10: Enter VAT related data. Click on ‘Save’ to save all of your data.
NOTE: You can click on ‘Print’ for the preview of your application to see if there are any errors. If there are any errors you can edit the application.
STEP 11: To edit the application, you have click on ‘Registration Log In’ seen on the left-hand side as shown below. Then you have to ‘Log In’ with the Username, Password and the Submission number given to you in the “STEP 8”. Then your application will be displayed and you can make corrections.
STEP 12 After entering all the data and making the correction (if there’s any) you can submit the application. Click on the ‘Submit’ button.
Your submitted application will be displayed in Submitted List in IRO officer’s portal.
How to Register for Excise for Business and Proprietary Business?
Follow STEP 1 to STEP 5 from ‘Application for Registration’. And proceed to steps mentioned below.
STEP 6: Tick on ‘EXCISE’. And under ‘Verifying Offices’, select where the application is to be registered. Then click on ‘OK’. Then you will be directed to ‘Your Submission Number’ page. Note down the given ‘Submission Number’.
STEP 7: Enter ‘PAN’ number. Since PAN is mandatory to be registered in VAT, the taxpayer must be registered in Income Tax.
STEP 8: Then you will be directed to ‘Business Registration Page’. Press the pen icon at the bottom of the screen in the business list. The system will load the existing business details. And press ‘Next’ button to go forward. You will be directed to ‘EXCISE Registration’ page.
STEP 9: On the ‘EXCISE Registration’ page there will be tabs (STEP 1, STEP 2, STEP 3, STEP 4, STEP 5, and STEP 6).
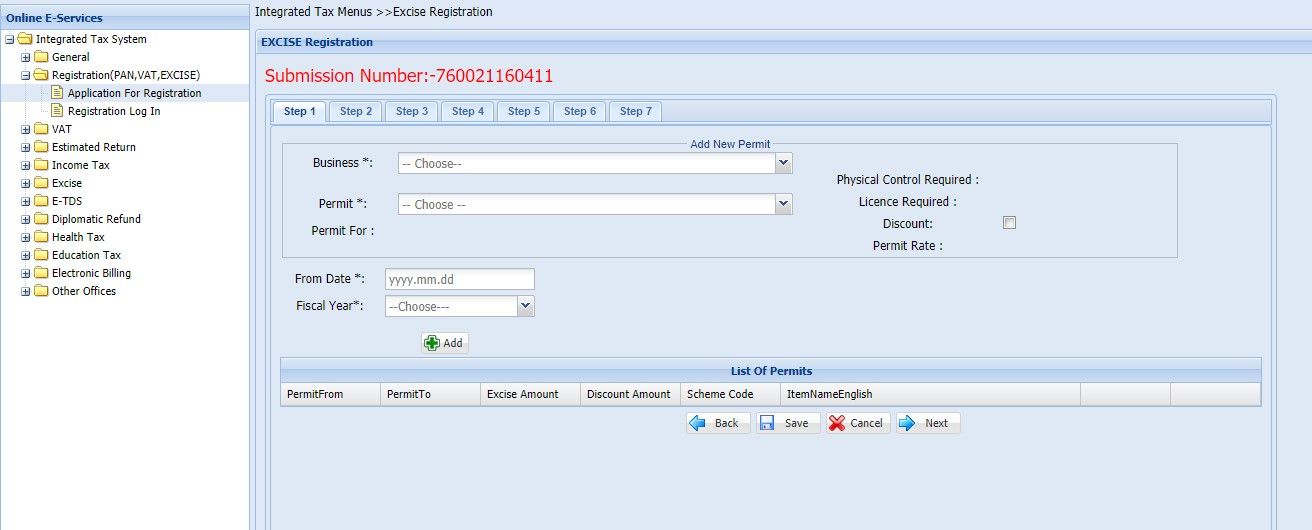
STEP 10: Tab STEP 1 (List of Permit)
Select the permit from the Permit combo box. After selecting the permit, it loads permit for of selected permit option. Check permit for (one or more). Enter ‘From Date’ and ‘To Date’ for that permit. Press Add button to add to ‘List of Permits’. And click the ‘Save’ button. This will display ‘List of Permits’ box. Then click on the STEP 2 tab.
STEP 11: Tab STEP 2 (List of Goods)
Select a permit from the permit combo box. After selecting a permit, it loads goods for that permit. Check goods (one or more) which you want from the permit Goods list. Press add button to add checked goods to the list of Goods. And Click on the ‘Save’ button. This will display the ‘List of Goods’ in the database. Then click on STEP 3 tab.
STEP 12: Tab STEP 3 (Workplace of Permit)
Select a permit from the permit combo box. Enter the workplace name and the purpose. Select address type (permanent or mailing). Select district and fulfill entire information of above screen. After filling the entire information, click on the ‘Add Work Place’ button to add a list of work Place. Before saving this record you must add godown of every workplace. For adding a godown, click ‘up arrow’ icon which opens a new pop-up window. Now fill entire information of Godown Address.
STEP 13: Click the ‘Save’ button. This will display ‘workplace information as well as godown information to database’ box. Then click on STEP 4 tab.
STEP 14: Tab STEP 4 (Production Stages Setup)
Select the permit from the permit combo box. After selecting the permit it loads workplace and stage. Check the workplace as well as stage. Click the add button to add stage to workplace stage list. And click the ‘Save’ button to proceed to STEP 5 tab.
STEP 15: Tab STEP 5 (Input and Output Raw Materials)
Select permit from permit combo box. After selecting a permit, it loads the stage of that permit. Check input raw as well as output raw materials. And click the ‘Save’ button, to proceed further tap on the STEP 6 tab.
STEP 16: Tab STEP 6 (All Record Submission)
Finally, click on the ‘Submit Registration’ button to submit all the records to STEPs.
STEP 17: Click ‘Print’ to print the Registration Form. Sign the application and submit to IRO/TSO/LTO officer for verification. Your submitted application will be displayed in Submitted List in IRO officer’s portal.
Also, for better understanding, you can watch this video. This is a complete tutorial on how to register Personal PAN online. In this way, you can register the PAN card in Nepal.
Acronyms Used
- PAN- Permanent Account Number
- VAT- Value Added Tax
- IRD- Inland Revenue Department
- IRO- Inland Revenue Office
- LTO- Large Taxpayer Office
- TSO-Taxpayer Service Officer
- OCR-Office of Company Register
More to Read: